How to Properly Install a Butterfly Valve
Installing a butterfly valve can be tricky. This blog post is intended to serve as a guide to help you make sure that you “check all the boxes” when installing your butterfly valve, as well as some important considerations to confirm that the valve operates correctly. We encourage you to bookmark this checklist, and to refer to it as needed when you’re working in the field.
Pre-Installation and Inspection
1. Conduct a detailed examination of the valve to ensure that the waterway is devoid of any debris or foreign particles. Also, make sure the adjacent pipeline is clean from any foreign materials that could potentially harm the seat and disc sealing surfaces.
2. Attach the actuator to the valve before initiating the installation. This aids in achieving a precise alignment of the disc in the valve seat.
3. Evaluate the valve's identification tag, checking for the materials used and the operating pressure. Verify that these details are appropriate for the intended usage.
4. Verify the dimensions, threading, and length of the flange bolts or studs to ensure they meet the required specifications.
*WARNING!* Installing the valve in service conditions beyond its specified ratings can lead to personal injuries or property damage.
Installation Procedure
1. Align the connecting pipe flanges accurately before installing the valve. Create enough separation between the pipe flanges to allow the valve body to be situated between them without making contact with the flange surfaces (See Figure 1). Handle the valve with care to avoid potential damage to the disc or seat faces.
For Lug style valves:
- Position the valve between the flanges.
- Mount all necessary bolts between the valve and the mating flanges. Hand-tighten the bolts, but not all the way.

2. Prior to fully tightening the bolts, ensure the valve is centered between the flanges, then open and close the valve carefully to confirm free and unobstructed disc movement (see Figure 2).
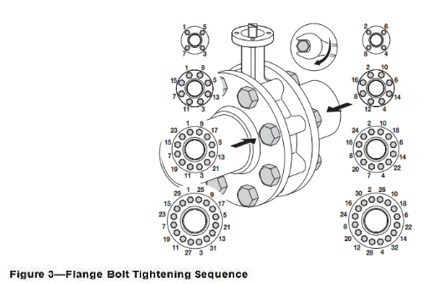
3. Tighten the flange bolts uniformly, adhering to the sequence illustrated in Figure 3, to achieve consistent compression.
4. Open the valve to the maximum open position and then back to the fully closed position, examining the actuator travel stop settings for correct disc alignment. It is crucial that the valve operates without any interference.
5. The valve is now ready for operation.
**Note:** Install the valve with the disc in the "ALMOST CLOSED" state. The use of flange gaskets is not advised.
Belimo butterfly valve assemblies come in a variety of sizes, ranging from 2 to 24 inches, and can accommodate both 2 and 3-way applications. They are specifically designed for use in ANSI pipe systems that necessitate zero leakage. You can choose from assemblies equipped with either NEMA 2 or 4X housing, offering a selection of Cv values. This flexibility makes these valve assemblies a cost-effective control valve solution, particularly for large-scale applications with high flow demands.
Are you looking for HVAC training? Belimo offers unlimited access to a library of high-quality, current, and engaging HVAC video tutorials from industry experts.

.png)